REVIT FOR INTERIOR DESIGNERS
  • Home
  • LET'S BUILD THIS!
  • How it Works
  • Register
  • The Revit Resource

The Revit Resource

Revit for Interior Designers

Revit Tips for Interior Designers: Importing AutoCAD Elevation Drawings

9/26/2023

 
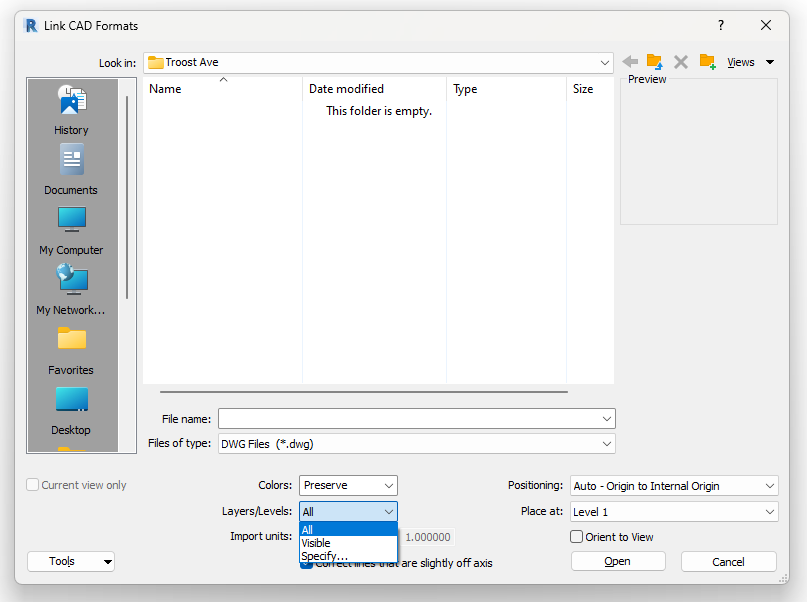
A common question I receive for interior designers is how to recreate an elevation, originally drawn in AutoCAD, while using Revit.  This concept is one that I use in my Revit for Interior Designers training course.

There are many advantages to using BIM, including improved collaboration, better coordination, and reduced errors. However, BIM models can be complex and time-consuming to create.

One way to speed up the BIM process is to import AutoCAD elevation drawings into Revit. This can be a great way to quickly recreate the 2D elevation views as Revit models.

Here is a step-by-step guide on how to import AutoCAD elevation drawings into Revit:
  1. Launch your elevation view in Revit.
  2. Click the "Insert" tab and then click the "LINK CAD" button (I suggest avoiding IMPORT CAD option as it brings undesirable AutoCAD elements into Revit)
  3. A window will open that allows you to browse to the AutoCAD file that you want to import.
  4. If you like, use Colors = Black and White to avoid importing AutoCAD layer colors.
  5. I would suggest using Positioning = Manual – Center option to select a point on the screen after importing your file
  6. Select the AutoCAD file and then click "Open".
  7. Use the Zoom All command (ZA) to locate your Autocad elevation in your Revit elevation view.
  8. If your AutoCAD file does not appear, I would launch your 3D View, select TOP on the View Cube, locate your Autocad file (should appear as a line), and drag it on top of your Revit floor plan.  Then, return to your elevation view and the Autocad drawing should appear. 
Picture
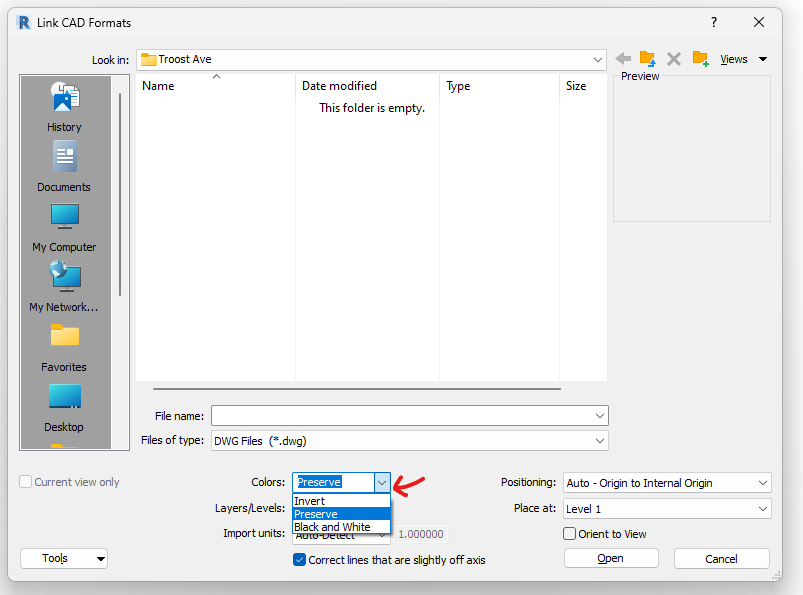
Here are some tips for importing AutoCAD elevation drawings into Revit:
  • If the AutoCAD drawing contains any layers that you do not want to import, you can turn those layers off before you import the drawing.  Use the Layers/Levels = Specify option
  • Once you have imported the AutoCAD drawing, you can use the Revit "Align" tool to align the drawing with the Revit model.
Picture
Importing AutoCAD elevation drawings into Revit can be a great way to speed up the BIM process and to create more accurate and complete Revit models.
    Picture

    Author

    John Manfredy has over two decades of expertise teaching architectural technology to architects and interior designers.  Coursework has included Autodesk products:  Revit Architecture, 3D Studio Max, Autocad and SketchUp.  

    Read his recommendations on Linkedin to learn more about his desire to help design professionals succeed in their careers.  He is seen as a mentor who pushes you to your potential. He'll engage you in his class with his infectious passion for design technology as well as collaborative approach.

    Find John in the Facebook Group Page:  Revit for Interior Designers
    or YouTube channel:
    ​http://bit.ly/youTubeRevit  

    Archives

    April 2025
    March 2025
    September 2023
    August 2023
    June 2023
    July 2020
    May 2020
    November 2018
    October 2018
    January 2018
    December 2017

    Categories

    All

    RSS Feed

Proudly powered by Weebly
  • Home
  • LET'S BUILD THIS!
  • How it Works
  • Register
  • The Revit Resource