|
Revit 2024 is now available, but it is causing my past Revit for Interior Designers (& architecture) students to scratch their heads.
For those that want to have Revit 2024 'look and feel' like prior releases, on the homescreen choose NEW, then the BROWSE button and choose either Commercial-Default.rte OR Residential-Default.rte depending on what type of project you would like to begin. 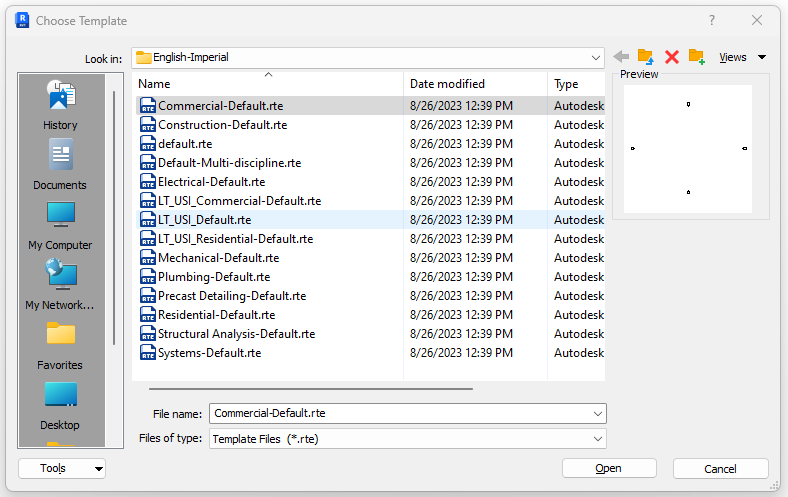 You will notice that although the screen looks the same, the Project Browser has been updated with new floor plans that appear in each elevation view. In addition, schedules and sheet have been added as well. 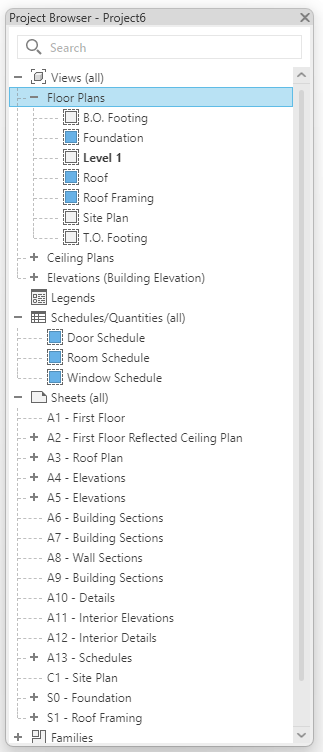 However, I do believe there is value at least understanding what the Multi-discipline template has to offer and understand how to manipulate what appears on the screen. In fact, it may be a good idea to add some of these techniques to your projects in prior releases of Revit. The first task is to understand the concept of Crop Regions and Scope Boxes. Understanding these concepts will allow you to quickly use the new Multi-discipline template OR deploy these tactics in any Revit project. Let's start by defining what a Crop Region does. The crop region command in Revit allows you to define the boundaries for a view. It is a rectangular area that can be drawn in any graphical project view. Once a crop region is created, it can be used to crop the view to its extents, or to control the visibility of elements in the view. To create a crop region, follow these steps:
When Crop Region is activated, the elements within the boundaries of the Crop Region will be visible in the view, while the other elements will be hidden. Here are some additional things to know about crop regions:
Watch this video on the topic of using Crop Regions in Revit: Next, lets discuss what a Scope Box can do for you in all versions of Revit A scope box is a Revit element that allows you to define the extents of a view. It is a rectangular area that can be drawn in any plan view. Once a scope box is created, it can be used to crop the view to its extents, or to control the visibility of elements in the view. To create a scope box, follow these steps:
Here are some additional things to know about scope boxes:
Watch this video on the topic of using Scope Boxes in Revit: Now that we understand the basics, how do we use both Crop Regions and Scope Boxes together to control the appearance of your Revit views. This final video combines both concepts and allows you to customize the initial Multi-discipline template in Revit 2024 to start a project. Enjoy!!! 
Revit Crashing on Startup. How to Fix! Troubleshooting Tutoria
During the course of interior design, Revit stands as a great tool for innovation and creativity. However, what happens when your software decides to thwart your efforts by crashing on startup? In this blog post, we'll delve into a real-life journey of frustration, persistence, and ultimate triumph over a relentless Revit startup crash. If you've ever faced a similar challenge or are looking to preempt one, this story might offer you insights and solutions that conventional troubleshooting couldn't.
When Revit Said "No More" The Trouble all began when I fired up Revit one morning, only to be met with an unfamiliar sight – the software crashed on startup without warning or error messages. Like many, I turned to the web for solutions and Googled "Revit crash on startup." I meticulously followed the prescribed steps from Autodesk's support forums, hoping for a miracle. You can follow the support site here: https://www.autodesk.com/support/technical/article/caas/sfdcarticles/sfdcarticles/Revit-2017-crashing-during-start-up.html Alas, the results were as disappointing as the crash itself. The solutions posted by Autodesk seemed promising on the surface, but they failed to yield any results. To make matters worse, my attempts to seek assistance from Autodesk's support desk proved useless, leaving me more perplexed than ever. A Radical Move: Rebooting, Uninstalling, Reinstalling, and the Reformatting. After rebooting my computer several times, and with my patience dwindling, I embarked on a radical path – uninstalling and reinstalling Revit. I tried to avoid this option as Revit is a very large program and you can quickly lose an hour of your time. The fresh install offered a glimmer of hope as the software seemed to cooperate temporarily. I celebrated my victory, only to have it short-lived. The software would work for a couple of days and suddenly the crashing curse soon returned, rendering my hard-won solution null and void. Finally, I decided that perhaps a virus infected by computer and decided to reformat my hard drive (and reinstall three years worth of software and customizations). This process took days but same result; Revit crashes on startup! The Turning Point: Enter Imaginit.com Determined not to be defeated, I sought out professional help. I contacted every long term Revit user I knew, but nobody ever experienced this issue. Am I the first? Enter Imaginit.com, a software solutions provider and Autodesk reseller. With their expertise, we embarked on an intensive two-hour troubleshooting session. We delved into the intricate labyrinth of software conflicts, hardware inconsistencies, and more. They were professional, thorough and had extensive software expertise. After an exhaustive examination, we reached a breakthrough. The Unlikely Culprit: Trendmicro Antivirus It turns out that the antagonist in this narrative was an unlikely one – my antivirus software, TrendMicro. The very software meant to protect my system was inadvertently wreaking havoc with my Revit experience. I have used this software exclusively for many years and NEVER had a conflict with Revit or any other software application. Imaginit's experts determined that TrendMicro was conflicting with Revit, causing it to crash upon startup. The Key to Victory: Adding Exceptions The solution was both surprising and straightforward. We added Autodesk directories to the exceptions list within Trendmicro. This simple yet effective action paved the way to stability. Revit no longer crashed on startup, and I was finally able to access my projects without the looming dread of a crash derailing my efforts. 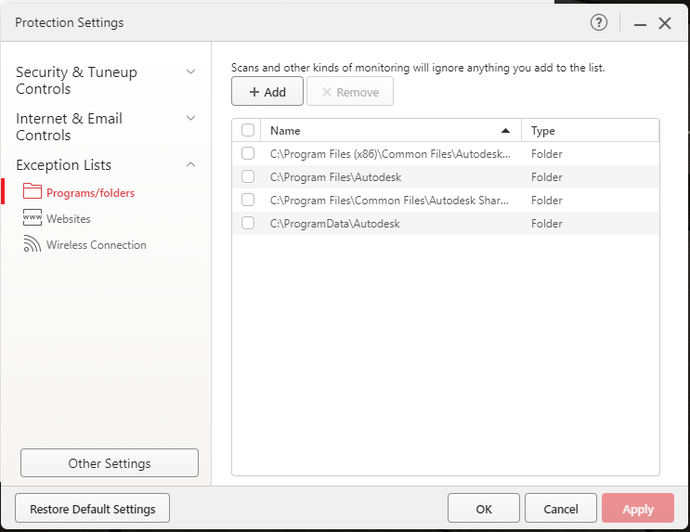
Conclusion: A Lesson in Tenacity and Adaptability
This journey through Revit crashing on startup taught me valuable lessons beyond troubleshooting steps. It reinforced the importance of tenacity, adaptability, and the willingness to seek outside expertise. While Autodesk's support channels faltered, Imaginit.com stepped in as the unsung hero, unriddling the mystery that plagued my creative process. To anyone facing a similar ordeal, I offer this narrative as a testament that solutions exist even when conventional paths fail. If Revit crashes on startup have derailed your work, consider exploring avenues that extend beyond the ordinary. Sometimes, a fresh perspective and the expertise of professionals can make all the difference. Let's make our architectural journeys smoother, our creative processes uninterrupted, and our Revit experiences crash-free (and LESS EXPENSIVE THAN MINE). After all, the most remarkable designs should be hindered by the least remarkable crashes. Have you encountered a similar Revit crash saga? Or have you found unconventional solutions to software troubles? Share your experiences in the comments below! Let's continue the dialogue and help fellow designers overcome their challenges. |

AuthorJohn Manfredy has over two decades of expertise teaching architectural technology to architects and interior designers. Coursework has included Autodesk products: Revit Architecture, 3D Studio Max, Autocad and SketchUp. Archives
September 2023
Categories |
 RSS Feed